
Full API Integration
CHANGELOG
| Version | Date | Changes |
|---|---|---|
| v1.1 | 2026-07-08 |
|
| v1.0 | 2026-04-01 | Initial release. |
FULL API INTEGRATION
Full API Integration is designed for partners who want to embed the full card issuing flow directly into their own system.
In this model, the partner does not use Sparados hosted mobile or web applications. Instead, the partner manages the end-user experience on its own side and communicates with Sparados APIs directly.
Full API Integration allows partners to:
- create users via API
- create cards via API
- manage card lifecycle
- retrieve and display card data, including PAN / CVV
- handle OTP and 3DS flows
- receive Apple Pay / Google Pay OTP notifications
- retrieve transactions and receive transaction notifications
This integration model gives the partner full control over the user and card flow, but may require PCI DSS compliance if sensitive card data is received, processed, stored, or displayed.
Before using Full API Integration, the partner must complete onboarding with Sparados, sign the cooperation agreement, and configure Mutual TLS authentication for the selected environment.
API Endpoints
|
API |
Integration |
BETA |
PROD |
|---|---|---|---|
|
Card, User, Card Data, 3DS and X-Pay Notifications API (swagger) |
Simple / Full |
|
|
|
Transaction API (swagger) |
Simple / Full |
|
|
1. SERVER-TO-SERVER SECURITY
Communication between the partner and Sparados is secured using TLS certificates. The authentication method depends on the communication direction.
Partner → Sparados APIs
All requests sent by the partner to Sparados APIs require Mutual TLS (mTLS). The partner must configure the client certificate provided during onboarding. The same client certificate can be used across all mTLS-protected APIs unless agreed otherwise.
Instructions for generating and configuring the client certificate are available in the Connecting Server-to-Server section.
Sparados → Partner Webhooks
Webhook notifications, including Transaction API, 3DS OTP and Wallet notifications, are delivered over HTTPS. During the TLS handshake, Sparados presents its TLS server certificate. The partner system should validate the certificate before accepting the connection.
CA Certificates:
• BETA – ca_beta.crt
• PROD – ca_prod.crt
These CA certificates should be used to verify the TLS server certificate presented by Sparados during webhook delivery.
2. HOW FULL API INTEGRATION WORKS
Full API documentation is available here:
Swagger Full API Documentation
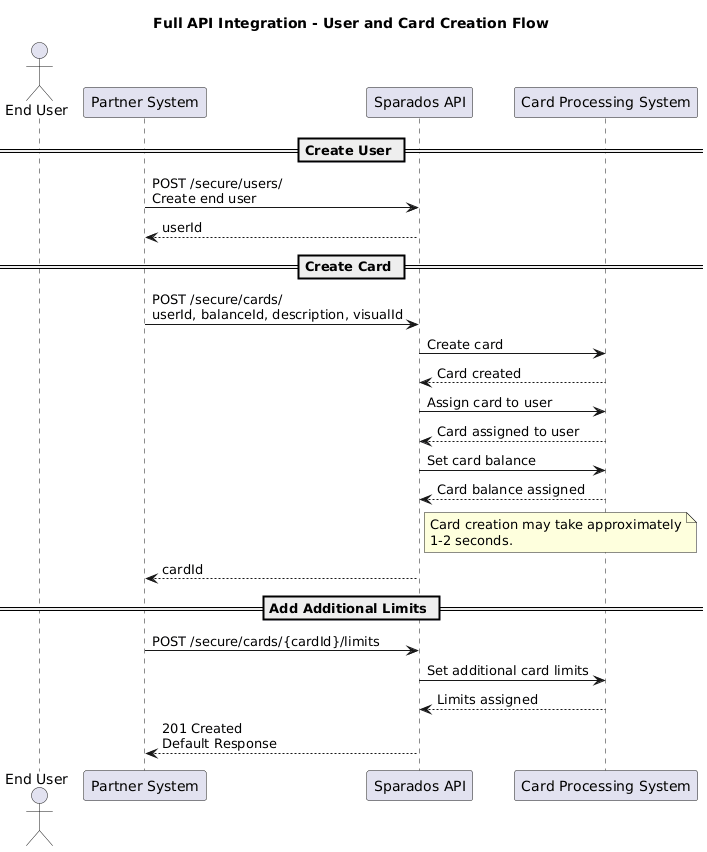
In the Full API model, the partner creates the end user and card directly through API.
The process starts with creating a user using:
POST /secure/users/
The partner must provide the required user details, including email, phone number, first name, last name, date of birth, and nationality. After the user is created, Sparados returns id, which should be stored as userId.
The partner then creates a card for this user using:
POST /secure/cards/
The partner provides the returned userId in the card creation request body, together with the balanceId of the balance from which the card should be funded and basic card details such as description and visual identifier.
Once the card has been created successfully, Sparados returns cardId.
If additional limits need to be assigned to the card, they should be added only after the card has been created, using:
POST /secure/cards/{cardId}/limits
After the additional limits are created successfully, Sparados returns 201 Created with the created limit details. Once the card has been created successfully, Sparados returns cardId.
3. VALUES USED IN SPARADOS CARDS API
Detailed Swagger documentation is available at the end of this document.
This section describes common value formats used across Sparados Cards API.
These rules apply when creating cards, defining card limits, setting validity periods, and managing card-related operations.
Date format
Sparados APIs use the ISO 8601 date and time format.
The expected format is:
YYYY-MM-DDExample:
2023-05-22Minor values
All numeric amount values used in Sparados Cards API are provided in minor units.
For example, to assign a card with a limit of 100.50 EUR, send:
10050This applies to values such as:
- card budget
- additional limits
- budget increases
- budget decreases
Currency
Cards are created in the currency of the linked balance. The currency does not need to be provided separately when creating a card, because it is inherited from the selected linked balance.
Each balance can have only one currency. Transactions may still be performed in other currencies, depending on the card configuration and transaction rules.
4. USER MANAGEMENT
In Full API Integration, the partner manages end users directly through API.
The user must be created before a card can be assigned to that user.
User API Methods
|
Method |
Endpoint |
Description |
|---|---|---|
|
|
|
Creates a new end user. |
|
|
|
Retrieves the list of users. |
|
|
|
Retrieves details of a specific user. |
|
|
|
Updates selected user details. |
|
|
|
Deletes or deactivates the user, depending on the agreed configuration. |
GET USERS
To retrieve the list of users created for the partner, use:
GET /secure/users/
This endpoint returns users available under the partner configuration. The returned user id should be stored as userId and used when creating or managing cards assigned to this user.
Example response:
[
  {
    "id": 123456,
    "email": "[email protected]",
    "phoneNumber": "48123456789",
    "firstName": "John",
    "lastName": "Smith"
  }
]
CREATE USER
POST /secure/users/
Required fields:
|
Field |
Type |
Description |
|---|---|---|
|
|
|
End user’s email address. |
|
|
|
End user’s phone number. |
|
|
|
End user’s first name. |
|
|
|
End user’s last name. |
|
|
|
End user’s date of birth. Recommended format: |
|
|
|
End user’s nationality. Recommended ISO country code, for example |
Example request:
{
  "email": "[email protected]",
  "phoneNumber": "48123456789",
  "firstName": "John",
  "lastName": "Smith",
  "dateOfBirth": "1990-01-01",
  "nationality": "PL"
}
Example response:
{
  "id": 123456
}
The returned id should be stored by the partner as userId and used when creating a card through POST /secure/cards/.
5. CREATE CARD
To issue a new virtual card for an existing user, use:
POST /secure/cards/
This endpoint issues a new virtual card linked to the selected balance and assigns it to the specified user.
The user must be created first through:
POST /secure/users/
After the user is created, Sparados returns id, which should be used as userId in the card creation request body.
The card is created directly using the selected balanceId and the assigned userId.
The partner can obtain the available balanceId values by calling:
GET /secure/balances/
The currency of the card depends on the selected balanceId. For example, if the card is linked to a EUR balance, the card currency will be EUR. If the card is linked to a PLN balance, the card currency will be PLN.
The budgetMinor field is optional. If it is not provided, the user can spend up to the amount available on the linked balance. If budgetMinor is provided, it defines the spending limit assigned to the card. A transaction is approved only if both the linked balance and the card budget are sufficient.
The visualId is provided by Sparados when a new card visual is created for the client. If it is not provided, the default card visual is used. Providing the correct visualId ensures that the card is displayed correctly in Apple Wallet and Google Wallet.
The description field is optional. It is displayed in the Sparados webview when the partner uses it to present card details, but the partner may also use this field to store its own card description or reference.
The response from POST /secure/cards/ may take approximately 1–2 seconds, because Sparados creates the card, assigns it to the user, and configures the card balance before returning the response.
Once the response is returned, the card is already created and ready to use. Sparados returns the created card data, including cardId. The partner should store this value, as it is required for later card management, card data retrieval, and adding additional limits to the card.
Request body example:
{
  "balanceId": "3fa85f64-5717-4562-b3fc-2c963f66afa6",
  "userId": 0,
  "budgetMinor": 0,
  "description": "string",
  "visualId": 0,
  "endDate": "2031-07-08"
}
Request body fields:
| Field | Type | Description |
|---|---|---|
balanceId* |
string, uuid | UUID of the balance the card will be funded from. The partner can obtain this value by calling GET /secure/balances/. The card currency depends on the selected balance. |
userId* |
integer | ID of the user the card will be assigned to. This value is returned by POST /secure/users/. |
budgetMinor |
integer | Optional spending limit assigned to the card, expressed in minor currency units, for example 10000 = 100.00 PLN. If this field is not provided, the card may spend up to the amount available on the linked balance. If provided, both the linked balance and the card budget must be sufficient for the transaction to be approved. |
description |
string | Optional card description. It is displayed in the Sparados webview and may also be used by the partner to store its own card description or reference. |
visualId |
integer | Card visual identifier provided by Sparados when a new card visual is created for the client. If not provided, the default card visual will be used. This value is required for correct card display in Apple Wallet and Google Wallet. |
endDate |
YYYY-MM-DD |
Optional card expiry date in YYYY-MM-DD format (Europe/Warsaw timezone). The date cannot be later than the default card validity of 5 years from the card creation date. If omitted, the card expires after 5 years. The card is automatically deleted shortly before midnight (Europe/Warsaw time) on the specified date.
|
Additional properties are not processed by the API.
Example response:
{
  "id": 354
}
GET CARD DETAILS
To retrieve information about an existing card, use:
GET /secure/cards/{id}
This endpoint returns non-sensitive card information together with the current card status, assigned user, linked payment balance, budget configuration and available spending amount. Sensitive card data such as the full PAN and CVV is not returned by this endpoint. To retrieve encrypted PAN and CVV, use GET /secure/cards/{id}/sensitive.
Example response:
{
  "id": 12,
  "userId": 35,
  "balanceId": "3fa85f64-5717-4562-b3fc-2c963f66afa6",
  "visualId": 5,
  "pan": "5414********2598",
  "expiryDate": "05/31",
  "endDate": "2031-05-31",
  "description": "Marketing Team",
  "status": "ACTIVE",
  "budgetMinor": 100000,
  "balanceMinor": 85000
}
Response fields
| Field | Type | Description |
|---|---|---|
id |
integer | Unique identifier of the card. |
userId |
integer | Identifier of the user assigned to the card. |
balanceId |
string (UUID) | Identifier of the payment balance linked to the card. |
visualId |
integer | Card visual identifier. |
pan |
string | Masked Primary Account Number (PAN) displayed for card identification. |
expiryDate |
string | Card expiration date displayed on the card (MM/YY). |
endDate |
string | Date when the card expires and becomes inactive. |
description |
string | Optional card description provided during card creation. |
status |
string | Current card status (for example: ACTIVE, BLOCKED, EXPIRED). |
budgetMinor |
integer | Total spending budget assigned to the card, expressed in minor currency units. |
balanceMinor |
integer | Current amount still available for spending from the assigned card budget, expressed in minor currency units. |
Note
budgetMinor represents the total spending limit assigned to the card, while balanceMinor represents the remaining amount available for spending. These values are independent from the payment account balance returned by GET /secure/balances/{balanceId}.
CARDS LIST
GET /secure/cards/
Retrieve a list of cards associated with your corporation, including their balance, budget and status. Supports filtering, sorting and cursor-based pagination.
Query parameters
| Field | Type | Description |
|---|---|---|
| id | integer | Filter by card ID |
| lastFourDigits | string | Filter by the last four digits of the card |
| userEmail | string | Filter by the assigned user's email |
| userId | integer | Filter by assigned user ID |
| balanceId | string (uuid) | Filter by funding balance ID |
| createdAtFrom | string | Filter by creation date, lower bound |
| createdAtTo | string | Filter by creation date, upper bound |
| status | string | Filter by card status: active, locked |
| orderBy | string | Sorting field: createdAt, id, userEmail, balanceMinor, budgetMinor, endDate. Default createdAt |
| orderDirection | string | Sorting direction: asc, desc. Default desc |
| cursor | string | Opaque cursor from a previous response's nextCursor |
| limit | integer | Max results per page, up to 1000. Default 100 |
Response fields
| Field | Type | Description |
|---|---|---|
| data | array | List of card objects |
| data[].id | number | Card ID |
| data[].userId | number | ID of the assigned user |
| data[].userEmail | string, nullable | Email of the assigned user |
| data[].balanceId | string (uuid), nullable | ID of the funding balance |
| data[].currency | string, nullable | ISO 4217 currency of the funding balance |
| data[].visualId | integer, nullable | Card design template identifier |
| data[].lastFourDigits | string, nullable | Last four digits of the card |
| data[].budgetMinor | number, nullable | Spend limit in minor currency units |
| data[].balanceMinor | number, nullable | Remaining spendable balance in minor currency units |
| data[].endDate | string, nullable | Custom expiry date, if set |
| data[].expiryDate | string | Default card expiry date, YYYY-MM-DD |
| data[].createdAt | string (date-time) | Card creation timestamp |
| data[].lockedAt | string (date-time), nullable | Timestamp the card was locked, if applicable |
| data[].status | string | Card status: active, locked |
| nextCursor | string, nullable | Pass as cursor to fetch the next page, or null if none |
Example response
{
"data": [
{
"id": 1234,
"userId": 88,
"userEmail": "[email protected]",
"balanceId": "67716ba1-081b-4919-8aae-9fdbee10be23",
"currency": "EUR",
"visualId": 1,
"lastFourDigits": "1234",
"budgetMinor": 50000,
"balanceMinor": 32000,
"endDate": null,
"expiryDate": "2031-05-31",
"createdAt": "2026-08-01T10:15:00Z",
"lockedAt": null,
"status": "active"
}
],
"nextCursor": null
}
CARD BUDGET
A card budget defines how much can be spent using a specific card. It is independent from the linked balance, which represents the actual funds available on the payment account.
| Field | Meaning |
|---|---|
budgetMinor |
Spending limit assigned to the card. This value defines the maximum amount that can be spent using the card. |
balanceMinor |
Available amount remaining from the card budget. This value decreases after successful transactions. |
Example:
Initial budget:
budgetMinor  = 100000 (1,000.00 EUR)
balanceMinor = 100000 (1,000.00 EUR)

After spending 250.00 EUR:
budgetMinor  = 100000
balanceMinor = 75000
Card budget and additional card limits are independent mechanisms. The card budget defines how much can be spent by the card, while additional card limits define how, where, and how often the card may be used, for example ATM withdrawals, e-commerce transactions, MCC restrictions, merchant restrictions, or transaction count limits. Both validations are performed during transaction authorization.
ADJUSTING CARD BUDGET
To adjust the card budget, use:
PATCH /secure/cards/{id}/budget
This endpoint changes the card budget by the value provided in adjustmentAmountMinor. A positive value, or a value without the + sign, increases the card budget. A negative value decreases the card budget.
Request body fields:
| Field | Type | Description |
|---|---|---|
adjustmentAmountMinor* |
integer | Amount by which the card budget should be adjusted. The value is expressed in minor currency units. Positive values increase the card budget. Negative values decrease the card budget. |
Examples:
{
  "adjustmentAmountMinor": 10000
}
This increases the card budget by 100.00 EUR.
{
  "adjustmentAmountMinor": -5000
}
This decreases the card budget by 50.00 EUR.
This endpoint does not add funds to the linked balance and does not change the payment account balance. The card must already have a budget configured. Otherwise, the API returns HTTP 409 Conflict.
RESETTING CARD BUDGET
To reset the card budget, use:
POST /secure/cards/{id}/budget/reset
This endpoint recreates the existing budget and resets the spent amount, making the full budget available again.
Request body fields:
| Field | Type | Description |
|---|---|---|
newBudgetMinor |
integer | Optional. If provided, the budget is recreated using the new value and the full amount becomes available again. If omitted, the existing budget value is reused and the available amount is reset to the current budget. |
The card must already have a budget configured. Otherwise, the API returns HTTP 409 Conflict.
6. CHECKING ACCOUNT BALANCE
To check the balance of the payment account connected with issued cards, use:
GET /secure/balances/{balanceId}
This method returns the current balance of the payment account linked to issued cards. This is the actual account balance, not the card budget.
The balanceId required for this method is provided by Sparados after the payment account is created for the partner.
7. ADDITIONAL CARD SPENDING LIMITS
After the card has been created, additional card limits can be assigned using:
POST /secure/cards/{id}/limits
This endpoint adds one limit to an existing card. Additional limits should be added only after the card has been successfully created and is ready to use. Each POST /secure/cards/{id}/limits request adds a single additional limit. Editing and deleting limits are also performed one by one. Only the GET method returns a list of limits assigned to the card.
All amountMinor values are provided in minor currency units, for example 10000 = 100.00 PLN. Amount-based limits are cumulative, not per-transaction limits. Each successful transaction reduces the remaining amount available until the applicable limit period resets or the limit is removed.
REQUEST BODY FIELDS
| Field | Type | Description |
|---|---|---|
type |
string | Type of the card limit. |
amountMinor |
integer | Amount limit in minor currency units, for example 10000 = 100.00 PLN. Used for amount-based limits. |
maxAttempts |
integer | Maximum number of transactions allowed within the selected period. Used for quantity-based limits. |
period |
string | Limit period. Available values: DAILY, WEEKLY, MONTHLY. |
mccList |
array of strings | List of merchant category codes used for MCC whitelist or blacklist limits. |
merchantIdList |
array of strings | List of merchant IDs used for merchant whitelist or blacklist limits. |
SUPPORTED LIMIT TYPES
TRX_ALL — cap on all transactions combined.
{
  "type": "TRX_ALL",
  "amountMinor": 50000,
  "maxAttempts": 10,
  "period": "MONTHLY"
}
TRX_E_COM — cap on e-commerce transactions only.
{
  "type": "TRX_E_COM",
  "amountMinor": 10000,
  "maxAttempts": 5,
  "period": "DAILY"
}
TRX_ATM — cap on ATM withdrawals.
{
  "type": "TRX_ATM",
  "amountMinor": 30000,
  "maxAttempts": 2,
  "period": "WEEKLY"
}
FOREIGN_AMOUNT — cap on the total amount spent in a foreign currency.
{
  "type": "FOREIGN_AMOUNT",
  "amountMinor": 20000,
  "period": "MONTHLY"
}
FOREIGN_QUANTITY — cap on the number of foreign-currency transactions.
{
  "type": "FOREIGN_QUANTITY",
  "maxAttempts": 3,
  "period": "DAILY"
}
QUANTITY — cap on total transaction count regardless of transaction type.
{
  "type": "QUANTITY",
  "maxAttempts": 100,
  "period": "DAILY"
}
AMOUNT_PLN — cap on PLN-denominated spend.
{
  "type": "AMOUNT_PLN",
  "amountMinor": 50000,
  "period": "WEEKLY"
}
AMOUNT_EUR — cap on EUR-denominated spend.
{
  "type": "AMOUNT_EUR",
  "amountMinor": 20000,
  "period": "MONTHLY"
}
MCC_BLACKLIST — blocks transactions at terminals with the given merchant category codes.
{
  "type": "MCC_BLACKLIST",
  "mccList": ["5812", "5813"]
}
MCC_WHITELIST — allows transactions only at terminals with the given merchant category codes.
{
  "type": "MCC_WHITELIST",
  "mccList": ["5812"]
}
MERCHANT_ID_BLACKLIST — blocks transactions at specific merchants.
{
  "type": "MERCHANT_ID_BLACKLIST",
  "merchantIdList": ["9AF3C2B1D4E5"]
}
MERCHANT_ID_WHITELIST — allows transactions only at specific merchants.
{
  "type": "MERCHANT_ID_WHITELIST",
  "merchantIdList": ["9AF3C2B1D4E5"]
}
RESPONSE
After the limit has been created successfully, the API returns 201 Created with the created limit details.
Example response:
{
  "id": "3fa85f64-5717-4562-b3fc-2c963f66afa6",
  "type": "TRX_ALL",
  "amountMinor": 0,
  "maxAttempts": 0,
  "period": "DAILY",
  "mccList": [
    "string"
  ],
  "merchantIdList": [
    "string"
  ]
}
The returned id is the limit ID. The partner should store this value if the limit may need to be edited or removed later. The same limit ID can also be retrieved using the GET method that returns the list of limits assigned to the card.
MULTIPLE AND OVERLAPPING LIMITS
The API allows multiple limits of the same type, including limits with the same period. All applicable limits are checked for each transaction, so the most restrictive limit is effectively enforced. For example, if a card has two weekly TRX_ATM limits of 100 EUR and 50 EUR, the effective weekly ATM limit is 50 EUR.
The API validates conflicts between whitelists and blacklists because these rules are mutually exclusive. MCC_WHITELIST and MCC_BLACKLIST cannot be active at the same time, and the same rule applies to MERCHANT_ID_WHITELIST and MERCHANT_ID_BLACKLIST.
GETTING, EDITING AND DELETING CARD LIMITS
If the partner wants to edit an existing limit, the partner must use the limit ID in the PATCH method. This limit ID is returned when the limit is created using POST /secure/cards/{id}/limits. It can also be retrieved by calling the GET method that returns the list of limits assigned to the card. To change an existing limit, the partner should either edit the existing limit using its limit ID or remove the existing limit first and then add a new one.
The difference is how accumulated usage counters are handled. If the existing limit is edited, the current usage counter is preserved. If the limit is removed and a new limit is created, the accumulated usage counter associated with the removed limit is not carried over to the new limit
For example, if the card has a TRX_ATM limit of 100 EUR and the user has already spent 20 EUR, then increasing the existing limit to 200 EUR means the user will still have 180 EUR available under this limit. However, if the partner removes the existing TRX_ATM limit and then adds a new TRX_ATM limit of 200 EUR, the accumulated usage counter is reset and the user will have the full 200 EUR available under the new limit.
Recommended approach:
If the partner wants to change the limit value while preserving accumulated usage, the existing limit should be edited using its limit ID. If the partner wants to reset accumulated usage, the existing limit should be removed and a new limit should be created.
Although the API allows multiple limits of the same type, removing or editing the existing limit before adding its replacement is recommended to avoid overlapping limits and unclear card configuration.
8. INTERNAL ACCOUNT TRANSFER
The transfer is performed directly between two balances identified by their balanceId values.
To transfer funds between payment accounts, use:
POST /secure/transfers/internal
The transfer is made between two balances identified by their balanceId values.
Both balances must belong to the same corporation and be maintained in the same currency. Transfers between different corporations or currencies are not supported.
Request body example:
{
  "senderBalanceId": "3fa85f64-5717-4562-b3fc-2c963f66afa6",
  "receiverBalanceId": "7c9e6679-7425-40de-944b-e07fc1f90ae7",
  "amountMinor": 10000
}
Request body fields:
| Field | Type | Description |
|---|---|---|
senderBalanceId* |
string, UUID | ID of the balance from which the funds will be transferred. |
receiverBalanceId* |
string, UUID | ID of the balance to which the funds will be transferred. |
amountMinor* |
integer | Transfer amount in minor currency units, for example 10000 = 100.00 EUR. |
Response
If the transfer is completed successfully, the API returns the identifiers of the two transactions created as part of the internal transfer.
{
  "receiverTransactionId": "3fa85f64-5717-4562-b3fc-2c963f66afa6",
  "senderTransactionId": "3fa85f64-5717-4562-b3fc-2c963f66afa6"
}
Response fields
|
Field |
Type |
Description |
|---|---|---|
|
|
string, UUID |
Identifier of the incoming transaction created on the receiver’s balance. This transaction represents the credit to the destination balance. |
|
|
string, UUID |
Identifier of the outgoing transaction created on the sender’s balance. This transaction represents the debit from the source balance. |
The returned transaction identifiers can be used to retrieve transaction details using the transaction endpoints or for reconciliation and audit purposes.
The source balance must contain sufficient funds to complete the transfer.
Available balanceId values can be retrieved using:
GET /secure/balances/
9. CARD DATA RETRIEVAL
To retrieve encrypted card details, use:
GET /secure/cards/{id}/sensitive
This endpoint returns sensitive card data, including PAN and CVV, in encrypted form.
The {id} parameter is the cardId returned by POST /secure/cards/
Encryption
Card details are always returned as a JWE token.
To decrypt the response, the partner must provide an RSA public key with each request.
The card data is encrypted using the provided public key. Only the holder of the matching private key can decrypt the response.
Requirements
|
Requirement |
Description |
|---|---|
|
RSA key pair |
Minimum key size: |
|
Public key format |
Base64-encoded SPKI PEM. |
|
Request header |
Public key must be sent in the |
|
Response format |
API returns encrypted payload as a JWE compact token. |
|
Encryption algorithm |
|
Request Header
|
Header |
Value |
|---|---|
|
|
Base64-encoded RSA public key in SPKI PEM format. |
Response Format
{
  "payload": "<JWE compact token>"
}
Decrypted Payload Example
After decrypting the JWE token, the payload contains card details:
{
  "id": 123,
  "type": "VIRTUAL",
  "cardNo": "5414599451242598",
  "cvv": "111",
  "exp": "2031-05-31",
  "issuerCardId": "1111111111111111",
  "dcCorporationId": "7f846a2f-92b4-4094-a776-35cf3753ef51",
  "balanceId": "67716ba1-081b-4919-8aae-9fdbee10be23"
}
Recommended Security Flow
If card data should be visible only to the end user, the key pair should be generated on the frontend side.
Recommended flow:
- The frontend generates a temporary RSA key pair.
- The frontend keeps the private key locally, for example in the user session.
- The frontend sends only the public key to the partner backend.
- The partner backend forwards the public key to Sparados API in the
Public-Keyheader. - Sparados returns encrypted card data as a JWE token.
- The encrypted payload is forwarded back to the frontend.
- The frontend decrypts the payload using the private key.
- PAN and CVV are displayed only to the end user.
Security Note
Never send the private key to Sparados API or to the partner backend if the decrypted card data should be accessible only to the end user. Only the public key should be sent in the request header.
Accessing, processing, storing, or displaying PAN / CVV may require PCI DSS compliance.
10. SPARADOS TRANSACTION API
Sparados Transaction History API allows partners to retrieve transaction history and receive transaction notifications.
The API consists of two parts:
|
Type |
Description |
|---|---|
|
Inbound API |
API methods called by the partner to retrieve transaction data from Sparados. |
|
Outbound API |
Webhook notifications sent by Sparados to the partner system when transaction events occur. |
Transaction API documentation is available here:
Authentication
Authentication and certificate requirements are described in the Server-to-Server Security section. Inbound API requests require Mutual TLS (mTLS). Outbound webhook notifications are delivered over HTTPS using the Sparados TLS server certificate.
Backward Compatibility
Future API changes will be backward compatible. The following changes may be introduced without breaking compatibility:
- adding a new endpoint
- adding a new optional request parameter
- adding a new optional response field
- adding a new enum value
- relaxing validation rules for an existing parameter, for example making it optional
- The partner system should ignore unknown fields and unknown enum values received in API responses.
Outbound Retry Strategy
If an outbound webhook call fails because of a timeout, connection issue, or HTTP 5xx response, Sparados will retry the call automatically.
|
Retry stage |
Description |
|---|---|
|
Initial retries |
3 retries with up to 5 seconds between each attempt. |
|
Extended retries |
If the call still fails, Sparados performs 3 additional retries after 15 minutes, 30 minutes, and 2 hours. |
|
Final result |
If all retries fail, the webhook call is dismissed. |
The partner endpoint should return a successful HTTP 2xx response after receiving and processing the notification. Webhook delivery should be treated as at-least-once, so the partner should process webhook notifications idempotently.
11. OTP AND WALLET NOTIFICATION WEBHOOKS
In Full API Integration, Sparados can send OTP and wallet-related notifications to endpoints provided by the partner.
The partner must provide Sparados with the full webhook URLs that should be used for notification delivery.
Webhook notifications are delivered over HTTPS using the Sparados TLS server certificate. Authentication and certificate requirements are described in the Server-to-Server Security section.
The partner endpoint should return:
204 No Content
to confirm that the notification was received successfully.
3DS OTP Notification
This webhook is triggered when a 3DS OTP is generated for a card in your corporation.
Endpoint
POST {3ds_otp_notification_url}
The full endpoint URL is provided by the partner during integration setup.
Request Body
|
Field |
Type |
Description |
|---|---|---|
|
|
|
Balance ID related to the card. |
|
|
|
Transaction currency. |
|
|
|
Merchant name for the transaction. |
|
|
|
3DS one-time password generated for the transaction. |
|
|
|
Card ID. |
|
|
|
User ID assigned to the card. |
|
|
|
Transaction amount in minor units. |
|
|
|
Last 4 digits of the card number. |
Example Request Body
{
  "balanceId": "3fa85f64-5717-4562-b3fc-2c963f66afa6",
  "currency": "EUR",
  "merchantName": "Example Merchant",
  "otp": "123456",
  "cardId": 123,
  "userId": 456,
  "amountMinor": 1000,
  "cardLast4Digits": "2598"
}
Expected Response
204 No Content
Wallet Notifications
This webhook is triggered when a wallet notification event occurs for a card in your corporation.
It is used for Apple Pay / Google Pay related events, including activation code delivery and token status updates.
Endpoint
POST {wallet_notifications_url}
The full endpoint URL is provided by the partner during integration setup.
Message Types
|
|
Description |
|---|---|
|
|
Wallet activation code should be delivered to the end user. |
|
|
Wallet token has been activated. |
|
|
Card has been removed from the wallet by the customer. |
|
|
Card has been removed from the wallet by the issuer. |
Request Body
|
Field |
Type |
Description |
|---|---|---|
|
|
|
Last 4 digits of the card number. |
|
|
|
Wallet provider / token requestor type. |
|
|
|
Wallet notification type. |
|
|
|
Activation method type. Present only for |
|
|
|
Activation method value. Present only for |
|
|
|
Wallet activation code. Present only for |
|
|
|
Device or wallet form factor. |
|
|
|
Card ID. |
Example Request Body
{
  "cardLast4Digits": "2598",
  "tokenRequestorType": "APPLE_PAY",
  "messageType": "ACTIVATION_CODE_DELIVERY",
  "activationMethodType": "SMS",
  "activationMethodValue": "48123456789",
  "activationCode": "123456",
  "formFactor": "PHONE",
  "cardId": 123
}
Expected Response
204 No Content
Important
The fields activationCode, activationMethodType, and activationMethodValue are present only when messageType is:
ACTIVATION_CODE_DELIVERY
12. API SWAGGER DOCUMENTATION
Detailed API documentation is available here:
|
API |
Documentation link |
|---|---|
|
Full API Swagger |
|
|
Cards API Swagger |
|
|
Transaction API Documentation |
|
Use the Swagger documentation as the source of detailed endpoint schemas, request parameters, response formats, and available enum values.
No comments to display
No comments to display